Here’s will be learn about how to unroot your android device. and may be finding some thing likeUnroot using SuperSU app, Unroot kingroot…. You know, Rooting your Android phone will give you many privileges as themes, kernels, custom ROMs and many others, but at the same time, it will void the warranty of your android device.
If you have a rooted Android device and want to get the guarantee of return or any reason, you can simply Unroot it. Once rooted your Android device will return to the stock firmware with a valid warranty. Here I will show you some easy ways to Unroot any root android phone or tablet.
See also:
Before you start Unroot your Android device, make sure you have done the following this:
- Charge your phone: Make sure your mobile battery is charged more than 50%.
- Back up your data: While unrooting your android mobile, all data will be erased. so make sure you back up all your important data is on your external SD card or PC.

How to Unroot Any Rooted Android Device
Method #1: Unroot using SuperSU app
This method works for all Android devices that have been rooted without installing custom recovery.
These steps will probably not work if you rooted using another application as root Kinguser or superuser applications and then later switched to SuperSu application. In any case, if you have SuperSu application installed in your rooted Android and is defined as the superuser app, then you can try the following to Unroot your device:
- Open the settings in the Android device. One way to open the settings press the menu button on the home screen and select the Settings option.
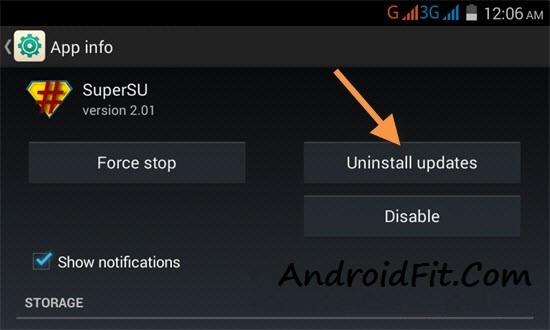
- In the settings go to Apps, select SuperSu application, and press the updates Uninstall button to remove updates for this application. You can not see this button if you do not have to update the SuperSu application to the latest version using the Play Store – in this case, just skip this step.

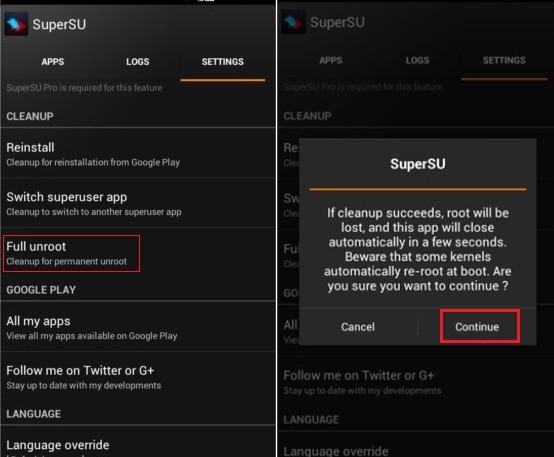
- Now open SuperSu app in apps drawer. In SuperSu screen, select the Settings tab.
- Scroll down on the SuperSu Settings screen, find the full Unroot called option and press it. You will see a warning message, press the Continue button to remove SuperSu and unroot your device.

- After unroot, superuser app will close automatically..
- Now simply restart your device.
- Now reboot your android device and when it boots up, uninstall SuperSU app by selecting Uninstall option on the SuperSU app page.
Method #2: Unroot Using ES File Explorer/Using Root File Browser / Root Explore App
If the above method does not work for you, then you can use this method to unroot your android phone.
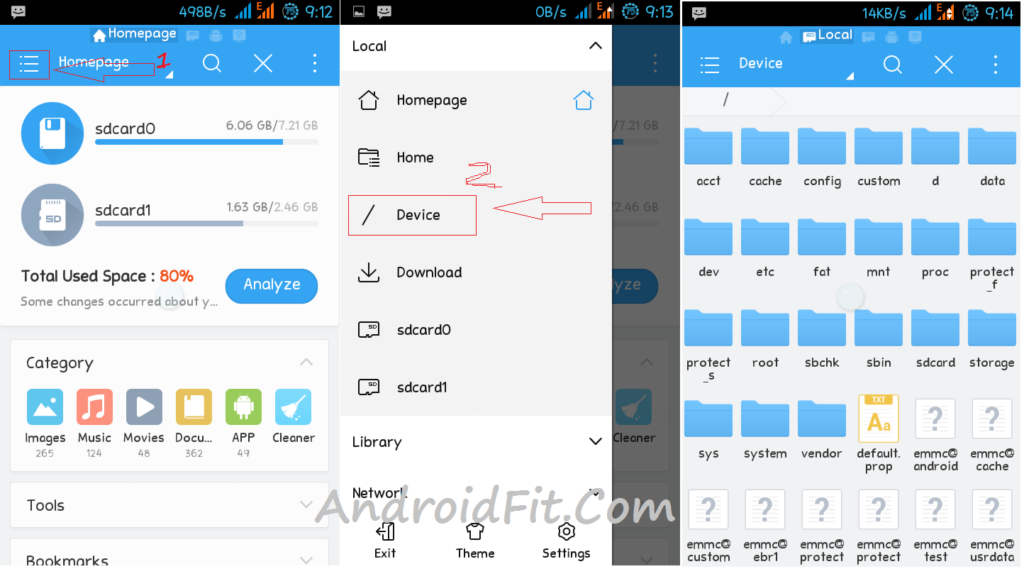
- Install ES File Explorer / Root Browser app or any root browser app on your device. Don’t move it to your SD card. Here i am using ES File Explorer app.
- Open the app
- Now tap on top-left corner tab menu and select ‘/ Device’ to turn it on.
- If superuser will ask you to grant privilege or root privileges to the app. Allow it.

- Now go to: system > bin folder. Find the busybox and su file and delete them. If you can’t find any of them, just skip to the next step.
- Back to system folder and open “xbin” and delete the file “busybox” and knew there (if you have found any).
- Go back and go to, system >app and then delete the superuser.apk file in the folder. That’s all.
- Now reboot your android device and it should be uprooted your android device.
Method #3: Unroot with OTA update
Sometimes just installing an OTA update will break root.
Here’ how to Unroot with OTA update:
- Look for a software update under Settings> About device.
- Now find OTA option.
- If update available then update your device via OTA.
Just be careful, as with certain methods of roots, it may not be possible to update successfully. In this case, you may need to flash the first original firmware. You can usually find on the manufacturer’s Web site, but you will need to find a guide for your device to find the right way to do it.
Method #4: Unroot Using Universal Unroot app
If you do not want to use SuperSU and root browser tutorials since always there is another option for you. You can use Universal Unroot app for Unroot your Android mobile. All you have to do is simply click on the button ‘Unroot’ and sometimes wait until the process is complete.
Method #5: Unroot for Framaroot app user
Select this option if you want Unroot your device. This option will delete SuperSU application and it is binary. (In other words, it is used to Unroot Android phone is rooted). Unroot for your device, follow the steps below.
- Unroot select from the drop down menu.
- Select an available exploit.
- It will remove SU and SU binary application also.
None of the root methods or unrooting methods are without risk, so always back up first, make sure your device is fully charged, read carefully, and take your time.
AndroidFit.Com hope these methods help you Unroot your Android device successfully. If you have questions, post in the comments.