In today’s interconnected world, privacy and security have become paramount concerns for internet users. As a result, the use of virtual private networks (VPNs) has skyrocketed. VPNs offer a secure and private browsing experience by masking your true IP address and encrypting your internet traffic. However, it’s essential to ensure that your VPN is working as intended and effectively hiding your true location. In this blog post, we will explore how you can check your real VPN location to ensure your online anonymity.

How to check if a VPN is working
Checking if a VPN is working properly is crucial to ensure that your internet traffic is being encrypted and routed through the VPN server. Here are some steps to help you determine if your VPN is functioning correctly:
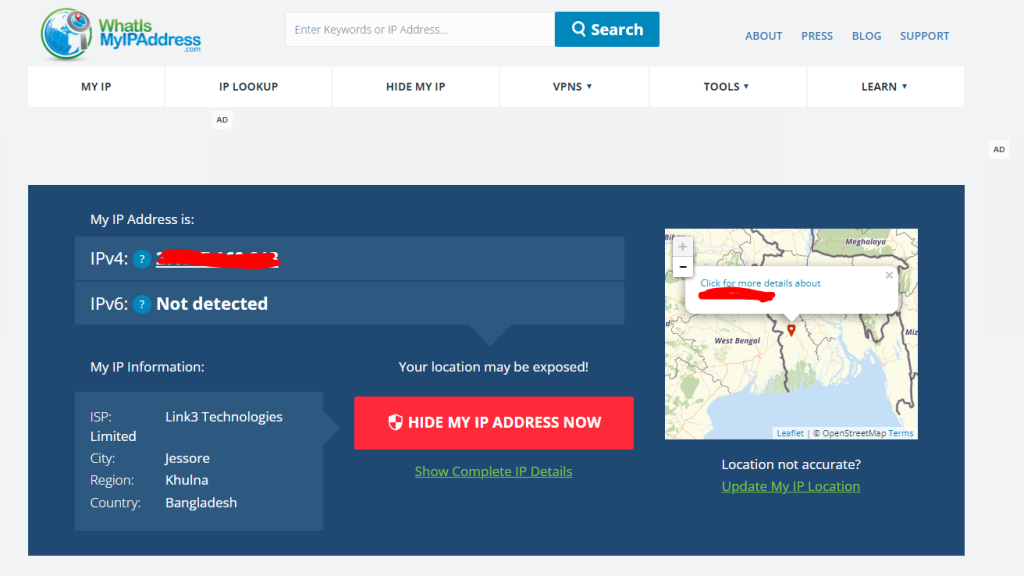
- Verify your IP address: Before connecting to the VPN, note down your current IP address. You can Visit “What is my IP address” to find this information. Make a note of the IP address displayed.
- Connect to the VPN: Launch your VPN application or configure the VPN settings on your device. Choose a VPN server location of your preference and establish a connection. Ensure that the VPN connection is established successfully.
- Check your IP address: After connecting to the VPN, go back to the same “What is my IP address” and check your IP address again. If your VPN is working correctly, the IP address should now be different from your initial IP address. It should correspond to the IP address of the VPN server you connected to.
- Test your location: Use a geolocation service or website to verify your virtual location (https://www.iplocation.net). Enter the IP address displayed by the geolocation service and see if it matches the location of the VPN server you selected. If it does, it indicates that your VPN is functioning properly.
- DNS leak test: Sometimes, even if your IP address is masked by the VPN, your DNS (Domain Name System) requests can still leak and reveal your actual location. To check for DNS leaks, you can use online DNS leak test websites. These tools analyze your DNS requests and verify if they are being routed through the VPN’s DNS servers. If the results show the DNS servers.
Why isn’t my VPN working?
If your VPN isn’t working as expected, there can be several possible reasons behind it. Here are some common issues and troubleshooting steps to help you identify and resolve the problem:
- Internet connectivity: Ensure that you have a stable internet connection. A weak or intermittent connection can hinder the VPN’s functionality. Try disconnecting and reconnecting to your internet connection or switching to a different network to see if it makes a difference.
- VPN server issues: VPN servers can experience downtime or connectivity problems. If you’re unable to connect to the VPN server, try selecting a different server location within the VPN application. If the issue persists, contact your VPN service provider for assistance or check their website or support channels for any known server issues.
- VPN client or application: Check if you are using the latest version of your VPN client or application. Outdated software can sometimes cause compatibility issues and prevent the VPN from functioning correctly. Update your VPN client to the latest version available and try connecting again.
- Firewall or antivirus software: Firewalls or antivirus software on your device may interfere with VPN connections. Temporarily disable any third-party firewalls or antivirus programs and try connecting to the VPN again. If the VPN works after disabling them, you can adjust the settings of the software to allow VPN traffic.
- VPN protocol: Some VPN services offer multiple protocols for connection. Try switching to a different protocol within the VPN settings, such as OpenVPN, L2TP/IPsec, or IKEv2, and see if it resolves the issue. Different protocols work better in different situations, so experimenting with different options can help.
- VPN subscription status: Verify that your VPN subscription is active and not expired. If your subscription has expired, you may lose access to VPN services. Contact your VPN provider if you have any subscription-related issues.
- Network restrictions: In some cases, network restrictions imposed by your internet service provider (ISP) or network administrator can interfere with VPN connections. Test your VPN on a different network, such as a public Wi-Fi network, to see if it works there. If it does, you may need to contact your ISP or network administrator to resolve the issue.
- Contact VPN support: If you have tried the above troubleshooting steps and your VPN still isn’t working, reach out to your VPN service provider’s support team. They have specialized knowledge and can assist you in resolving the problem.
Remember, troubleshooting steps may vary depending on the VPN service and the device you are using. It’s always a good idea to consult the VPN provider’s documentation or support resources for specific troubleshooting instructions.
How to check for DNS leaks
Checking for DNS leaks is an important step in ensuring your online privacy when using a VPN. Here’s how you can check for DNS leaks:
- Visit a DNS leak test website: Several online tools and websites can help you determine if your DNS requests are leaking. One popular option is dnsleaktest.com. Visit the website using your web browser.
- Disable VPN temporarily: Before performing the test, temporarily disable your VPN connection. This will allow you to establish a direct connection to your regular internet service provider (ISP).
- Note down your original IP address: On the DNS leak test website, take note of the IP address displayed. This is your original IP address without the VPN connection.
- Enable VPN connection: Reconnect to your VPN and ensure that the connection is established successfully.
- Perform the DNS leak test: On the DNS leak test website, initiate the test by clicking on the “Start” or “Check for DNS leaks” button. The test will analyze your DNS requests and display the results.
- Review the results: The DNS leak test will show you if there are any DNS leaks detected. Ideally, it should display only the IP address associated with the VPN’s DNS servers or the DNS servers you have configured manually. If any other IP addresses, especially your original IP address, are detected, it indicates a DNS leak.
- Troubleshooting DNS leaks: If the DNS leak test reveals a leak, there are a few steps you can take to address the issue:
- Ensure that your VPN software is up to date. Check for any available updates and install them.
- Switch to a different VPN protocol within your VPN settings. Some protocols may offer better protection against DNS leaks.
- Configure your device to use the VPN’s DNS servers instead of your ISP’s DNS servers. This can usually be done within the VPN settings or your device’s network settings.
- Contact your VPN service provider for further assistance. They can provide specific guidance on resolving DNS leak issues.
By performing a DNS leak test, you can identify and address any potential vulnerabilities in your VPN connection. Regularly checking for DNS leaks helps ensure that your online activities remain private and protected.
Conclusion:
Checking your real VPN location is an essential step in ensuring your online privacy and security. By understanding how VPNs work and utilizing reliable geolocation tools, you can verify if your VPN is effectively masking your true location. Remember to choose reputable sources and cross-verify results for accuracy. With a trustworthy VPN and proper location-checking techniques, you can browse the web with confidence, knowing your online activities remain private and secure.